After searching and searching for the perfect chair to upcycle, I fell upon this mid-century beauty with smooth lines. I adoringly named her Bessie, as she reminded me of the good 'ole midwest of my grandmother's childhood stories.
 |
| Bessie (What a beauty, eh?) |
Bessie was sturdy with an industrial construction that had lasted 50 years and would last at least another 50 with the right TLC. After living with particle board furniture for the past decade, I've taken a great appreciation for things that are made well. In fact, I have a great appreciation for anything that is made well or done well. It takes a certain amount of confidence and pride to make something
well. This notion seems to be a thing of the past and something that has been traded in for particleboard, brevity, and convenience. Sure, its hard to travel with a solid wood chair from place to place when you're bouncing apartments in NYC, but wouldn't it be nice to have a piece that stood the test of time? Wouldn't it be nice to own a fine chair like Bessie?
I think so, so I went to work giving her a facelift. The good news was, when I went to pick Bessie up, it turned out she had a twin. Two chairs to upcycle! Alright!
She had a lot of rough spots that I was sure to photograph along the way during her transformation.
 |
| Busted Bessie 1 |
Though her frame was sturdy she was deeply scratched, stained, and in need of a good sanding.
My first order of business was to give her a good scrub. I did this with soap and water and made sure to let her dry overnight so that I would have completely dry wood when it came time to sanding.
 |
| Busted Bessie 2 |
Second Order of Business:
After purchasing a very fine and fine hand sander from the home depot, I went to work. I should note that I wore a protective mask during this process as many paints and stains from back in the day contain a dangerous amount of lead if inhaled. I also made sure to sand her down outside, as you don't want the dust from sanding in your home. Though I'll be painting this chair with chalk paint (which typically doesn't require a lot of sanding as its not a latex-based paint that will sneak into nooks and crannies), I had some deep scratches to contend with. After putting in some elbow grease, I got the Bessies to the point of being ready for paint!
 |
| Busted Bessie 3 |
Third Business:
Finally, I was ready to paint. I mentioned above that latex-based paint tends to be less forgiving when it comes to painting old furniture with scratches. The way I tend to think of it is in terms of pants: If you were to put on a pair of tight silk pants (stay with me) it would show every imperfection and every panty line. However, if you were to put on a nice pair of stretchy lycra pants with butt smoothing technology (again, stay with me), those imperfections would be hidden. The same can be said about spray paint/latex paint vs. chalk paint.
Yes, chalk paint costs more. Yes, you may have to special order it from an indy paint store and wait for a week (a whole week, I nearly died in anticipation) for it to arrive. But it's SOO worth the wait. Besides, the Bessies' deserve the best.
 |
| Bessies, ahem, bottom |
Notes on Painting:
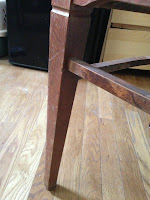
1. Your first coat will look ehh. Have faith, the second coat is marvelous.
2. Chairs are hard to paint. There are A LOT of nooks and crannies and angles to take care of (see photo to the right). Be sure to flip the chair over to make sure you're not missing any spots.
3. A little bit of chalk paint goes a very long way. Only dip the tip of your brush in the paint until you start to understand how much paint you will need for each area.
4. Slow down. Take your time. Treat her right.
Order of Painting Operations:
The order of operations I used to paint this chair was as follows:
F- paint the front and top of the chair and everything you can see when you're standing in front of the seat.
B- paint the back of the chair. Do this immediately after painting the front as you might get drips of paint on the opposite side that need to be taken care of ASAP. Let the two sides dry.
F-flip the chair over (like in the photo above) and use a smaller brush to carefully paint in the areas missed. Using a smaller brush will allow you to work around the already dry paint of the FB, and make sure to not have any drips.
S- Take the chair outside into the sun. Yes, outside (but only when its sunny and beautiful out). Let the chair dry, and then go back outside and look for any imperfections or places where you need to add more paint. The sun will reveal every detail you missed. Repeat the process. Two coats should be more than enough.
G-Get some wax. I used Annie Sloan clear wax once she had two final coats. You should use enough to give her a nice even coat that isn't sticky. If its sticky, you've put too much wax on. Once the wax is fully on the chair, it'll take 2-3 days for the paint to set completely.
To remember this order, just think of this: For Bessie, For Sexy Guuurl. Because that's what we're doing. We're making Bessie sexy again.
Final Notes/Mr. Belvedere moment:
In all seriousness, bringing this chair back to life brought out a sense of meaningfulness that felt great. Sentimental. Maybe I was listening to a little too much Robyn, but I found this process to be empowering. I felt like I was giving great respect to something that deserved the effort. Making something and working with my hands and slowing down to give enough time to each individual process gave me a great sense of mindfulness while working on this piece. When I was finished, Bessie was new again. She was vibrant and beautiful and made me sad that I would have to sell her. I just hope someone finds Bessie as lovely as I did.
The Final Product:
These photos were taken with another piece I worked on after finishing the chairs, which is also for sale for $215. The Bessies are on sale for $115 each or $200 for the pair. They are identical.
As always, thank you for reading!


